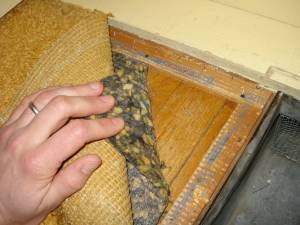
Many older homes have hidden treasures lying beneath wall to wall carpeting (as shown in Figure 1), vinyl tile and other floor coverings. Prior to wall to wall carpeting the standard for a finished floor was hardwood. It was a relatively inexpensive product as we still had plenty of new growth forests to harvest and it was relatively easy to install as knowledgeable and competent trades people were readily available.

Figure 1 - Hardwood Flooring Under Wall To Wall Carpeting
Many older homes had wall to wall carpeting and other modern
floor coverings laid over these beautiful floors. In many cases this is highly advantage because the carpeting protected the hardwood flooring from years of abuse. Now many owners of older homes are lifting the carpeting to find beautiful hardwood, in many cases hardwood that can no longer be purchased at reasonable prices. Hardwood that with some sweat equity can be restored to its original beauty.

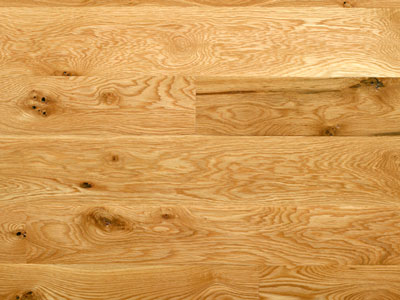
Figure 2 - Old Growth White Oak
Some of the hardwood flooring originally installed in older homes is wide plank flooring. This lumber was cut from old growth trees and came in widths from 3 to 12 inches, as shown in Figure 2.
You won't find wide plank flooring at your local big box retailer, but there are still specialty mills that produce these planks and will mill them to your specifications including having them quarter sawn.
If you have an older home that has wall to wall carpeting installed it may be to your benefit to look underneath the carpeting to determine what lies below, as you may have a hidden treasure.
Investigating:

Figure 3 - Carpet tack strip
Most wall to wall carpeting is installed by stretching it over tack strips (strips of wood with the points of the nails pointing in the upward direction, as shown in Figure 3, the carpeting is drawn tight and dropped onto the protruding nail points to hold it in position. In a corner of the room, lift the carpet to see what lies below.
It should be noted that in some cases, wall to wall carpeting was glued down. If this is your situation you will be confronted with the daunting task of removing the carpet, which usually requires a scraper of some sort. Although it is relatively easy to re-install carpeting if tack strips have been used, it is next to impossible to re-install carpeting that has been glued down. If you face a glued down carpet, raising a corner has probably committed you to redoing the flooring in some manner.
Don't be taken aback if the hardwood flooring that you have discovered is scratched, marred or has stains. In most cases all of these problems can be corrected.
Wear Layer:

Figure 4- Wear Layer
The basic factor that determines whether any hardwood flooring can be restored and/or refinished is the amount of lumber that remains above the groove that is milled into one side of the lumber for installation, see Figure 4. This area is designated as the wear layer. Most hardwood flooring can be sanded a few times before it becomes to thin to be sanded anymore. There was and still is no standard for the wear layer thickness and each mill determined its own thickness and there is no definitive standard as to how much wear layer must remain after restoration, but in my opinion it should not be less than 1/8 inch.
Determining how much wear layer is left on your hardwood flooring is not an easy task. If you have forced air heating you may be able to see the edge and hence the remaining portion of the wear layer of the hardwood boards by removing one of the air vent registers. Another area that might give you an indication of the wear layer include holes that may have been drilled for radiator piping or you can remove a baseboard and by using a mirror look at the edge of the hardwood boards.
Commencing Hardwood Flooring Restoration:
There is no definitive guide to what you may or may not find when the carpeting is removed. However there are some likely scenarios:
- Under most wall to wall carpeting is an underpad. The underpad is normally installed using staples around the perimeter of the rolls of padding and randomly inserted throughout the underpad. There can literally be hundreds of these staples and they all have to be removed.
- Screws and nails that were installed to correct and repair loose floor boards and squeaks, should be removed and the squeaks and loose floor boards should be repaired properly.
Additional information on removing staples from hardwood flooring.
Additional information on repairing squeaky floors and loose floor boards.

Figure 5 - Small Pry Bar

Figure 6 - Pry Bar Set
- The carpet tack strips will have to be removed. The best tool to use to perform this task, is a small pry bar, see Figure 5. However if you are seriously going to undertake the restoration of a hardwood floor you should consider investing in a set of small pry bars, see Figure 6, they are not expensive and will make your restoration task much easier.
- It is not uncommon to find stains, especially pet urine, and in many cases the staining has saturated a portion of the boards from top to bottom, they may even be beginning to rot. These boards will have to be replaced. Look for replacement boards in closets. It may also be necessary to sacrifice the old hardwood flooring in one room in order to obtain enough identical replacement boards for the rest of the home.
- If walls have been removed, you will find areas where the hardwood flooring is missing. Again, it will be necessary to find the boards elsewhere in the home.
- It is also not uncommon to find glued down flooring materials such as carpet, linoleum and asphalt tile. Although it will take some extra effort to remove the floor covering and the glue, that material has most likely protected the hardwood from damage, especially dents, gouges and stains from pets or spills. The hardwood flooring can definitely be brought back to its original beauty.
