A 4-way switch, as shown in Figure 1, is used to turn a light fixture OFF
and ON
from three or more locations.
Wiring a light fixture so that it can be turned ON
or OFF
from more than 2 locations requires the installation of both 3-way and 4-way switches.
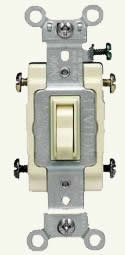
Figure 1 - 4-Way Switch
Selection of 4-way switches.
There are numerous wiring scenarios. If you are replacing a 4-way switch it is only necessary for you to remove the wires from the defective switch and install them on the replacement switch in the same manner.
If you are installing a new circuit, then it is best if you feed the AC power to either the first switch or the light fixture. To feed power to a switch in the middle of the circuit, makes wiring that much more confusing.
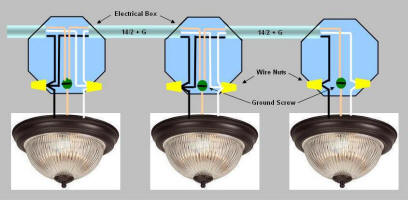
It should be noted that the circuit can control more than one light fixture. Additional light fixtures are run in parallel to the first fixture.
4- Way Switch Installation - Layout Diagram 1 (Figure 2):

Figure 2 - 4-Way Switch Installation - Layout Diagram 1
4-Way Switch Wiring Diagram: Power enters at light fixture box, proceeds to first 3-way switch, proceeds to a 4-way switch, proceeds to a 3-way switch at end of circuit (Figure 3).
Click on image for larger view
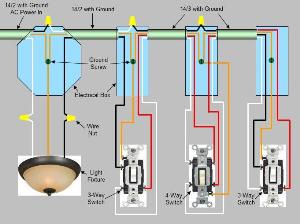
Figure 3 - 4-Way Switch Wiring Diagram: Power enters at light fixture box, proceeds to first 3-way switch, proceeds to a 4-way switch, proceeds to a 3-way switch at end of circuit.
4- Way Switch Installation - Layout Diagram 2 (Figure 4):

Figure 4 - 4-Way Switch Installation - Layout Diagram 2
4-Way Switch Wiring Diagram: Power enters at 3-way switch box, proceeds to a 4-way switch, proceeds to a 3-way switch, proceeds to light fixture at end of circuit (Figure 5).
Click on image for larger view
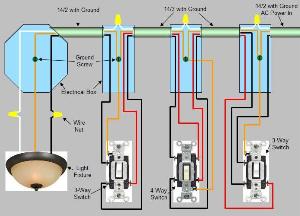
Figure 5 - 4-Way Switch Wiring Diagram: Power enters at 3-way switch box, proceeds to a 4-way switch, proceeds to a 3-way switch, proceeds to light fixture at end of circuit.
The possible wiring diagrams for the installation of 4-way switches are almost unlimited. The previous 4-way switch wiring diagrams provided wiring instructions based on the light fixture being at the beginning or end of the wiring installation.
It is possible that the light fixture resides in the middle of the wiring with switches before and after the light fixture. Figures 6 and 7 provide wiring diagrams where the light fixture resides in the middle of the circuit.
Click on diagram for larger view.
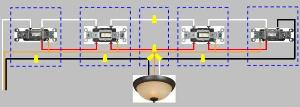
Figure 6 - 4-Way Switch Wiring Diagram: Power enters at 3-way switch proceeds to 4-way switch, proceeds to light fixture then on to another 4-way switch and then to a 3-way switch.
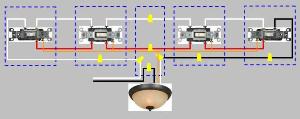
Figure 7 - 4-Way Switch Wiring Diagram: Power enters at light fixture and proceeds to 3-way and 4-way switches in opposite directions.
In theory, there is no limit to the number of switches that you can have in any specific circuit. Additional switches in the circuit are 4-way switches and are installed between two 3-way switches, as shown in Figure 8.

Figure 8 - Five switches controlling a light fixture utilizing two 3-way switches and three 4-way switch with power to light fixture.
4-Way Switch Wiring Diagram: More than three locations to control light fixtures utilizes 3-way switches at the end of the switched circuit and 4-way switches in the middle (Figure 9).
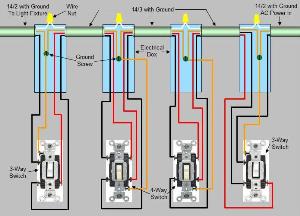
Figure 9 - 4-Way Switch Wiring Diagram: More than three locations to control light fixtures utilizes 3-way switches at the end of the switched circuit and 4-way switches in the middle.
If your application requires multiple light fixtures controlled by the same 3-way and 4-way switches the additional light fixtures should be wired in parallel to the first fixture. The circuit should be connected to the point where the first light fixtures wires are connected to the power - after the switches.
Light Fixture Wiring Diagram: Multiple light fixtures controlled by 3-way switches (Figure 10).
Click on image for larger view
